Adventures In Texture Editing

Those Unrest / Luclin texture substitutions look really good! It's a shame the Verant's early tree textures were done in such a weird way, because there's probably no way we'll ever be able to improve upon them thanks to the really weird transparency and distinct shape they make use of. :(

I had no idea .dds files could simply be renamed to .bmp without creating some kind of conflict with the client--at least in Sony's official retextures. :psyduck: Would the same thing work over non-retextured zones, I wonder? If so, there's huge potential for custom hi-res retexturing. Must investigate...

By the way, when you find yourself renaming whole sets of textures, do you do them one by one or do you use some kind of script or other program to do mass renames? I supposed you'd really only do mass renames for stuff like water, which is usually named something along the lines of wat1.bmp, wat2.bmp, etc., but I'm just curious if you've got a more efficient way to rename things en masse. (I myself would find it very handy to have a faster way of renaming race textures when I'm moving them around for various purposes.)

Also, the idea you laid out in this post regarding replacing textures without the need to do any actual work inside the .s3d files sounds great, but unfortunately, I have zero know-how when it would come to making something like that happen. Are you sure it is possible? I have become very accustomed to the contents of several file types used by the client, but I have yet to touch the surface on .bat files.
It works for both the low res original .s3d files and high res .s3d retextures the only difference I can see between them is the higher resolution textures the .wld files are the same size between both. The funny part is if I try to view the old .s3d .bmp files after extracting them with IrfanView they don't give that warning I told you about about them being renamed .dds files. I believe it further validates my suspicion that that Sony merely renamed the extensions on .dds texture files extensions to .bmp with the retextures.

So this is how unrest low res looks with a high res skyrim 2k fieldgrass01.dds texture used to overwrite the default xgrasdir.bmp for the floor. I kind of randomly picked one out of a few I saved to folder that I liked and thought would be generally useful to experiment with. That one just coincidentally looks clutch in fitting in with Unrest it's a keeper to me personally it Halloweenish


As far as texture naming I have show file extensions turned on in my windows folders option and I take the original texture file name and extension that goes with it I copy the whole thing then I paste the name to overwrite the name and extension of the texture I'm using as a replacement. I work with the textures on a one by one basis though as far as modding them the only way to really know how they end up looking is verifying in game. You can zone or /q and log back in after you copy a .s3d file with your changes to see how they turned out.

As far as the .bat thing is concerned I'm not certain, but I have a strong suspicion it's plausible the program is transpfx.exe Nilbog from project 1999 who's also a member of EQemu is the one that really knows more about the particular program. I just took a look at the .bat file that's used to configure transpfx.exe it with Notepad++ to see what it looked like for curiosity sake. Basically my intuition is that if it can patch all types of transparency fixes using .bmp and .dds files from .s3d files so it likely can patch over any type of .bmp or .dss or .s3d files provided you setup the .bat to do what you want it to.

For me retexuring is actually a by product a greater goal in mind I want to be able to reform, reshape, and recreate custom continents. Here's a little easier example of what I mean. Granted some of this is possible with EQemu anyway, but the texture clashing is horrendous in a lot of cases to the point of not being remotely desirable because of the loss of natural immersion.


With that said a a retexture show casing of a bunch of different possibilities. The reddish cedar looking bridge was a GIMP hue/saturation filter I did to one of the 2K Skyrim textures for wood floors I also used small tiles in GIMP to make the wooden planks smaller in width was attempting to correct how the texture doesn't line up properly so they align naturally and that's a EQ problem the original looks unaligned and crappy too, but it's just lower resolution. As far the red hue bridge was trying for a bloodied worn stained look cause you know trolls are badmofo's!



 
I blew through the last couple of posts quickly and will reread later, but what kind of rename are you talking about?

Litterally, just changing the 3 letters at the end of the extension? *.dds to *.bmp ?
Could use a batch file to do that very easily, or one of a dozen programs (XnConvert, ReaConverter)

Here is a simple rename .bat I did last month when I was playing around with textures:
Code:
@echo off

REM ****************************
REM Created By Daffie 2013-09-10
REM Copy and Rename dynamic file names from the specified directories from *.DDS to *.BMP
REM ****************************


REM Variables - Edit the stuff between the quotes
SET InputLocation="C:\Users\Daffie\Desktop\EQ Textures\Extracted Textures From EQ\Vectored Textures\Converted to PNG\Resized PNG\Converted to DDS\"
SET OutputLocation="C:\Users\Daffie\Desktop\EQ Textures\Extracted Textures From EQ\Vectored Textures\Converted to PNG\Resized PNG\Converted to DDS\Renamed to BMP\"


REM Copy and Rename dynamic file names (overwrite in destination folder)
copy /y %InputLocation%*.dds %OutputLocation%*.bmp


REM Pause to see how many files have moved
PAUSE


REM Exit Program
END

Are you talking about converting the actual images to the *.bmp format once extracted? Incidentally, the 2 programs above should be able to do that for you too (in bulk.)
Changing the last 3 letters at the end of the extension is merely so you can use the .dds file as a .bmp file in the .s3d file.

I think this is all that's needed from a .bat file.

1) A way to extract .s3d textures. - Only needed if reusing original game textures for different zones.
2) A way to rename the file name and file name extension if necessary to .bmp. - Older zones used .bmp newer zones use .dds
3) A way to overwrite the new textures back into the .s3d file.
4) A way to backup your original .s3d file to a created folder (optional)

So basically for a complete zone overhaul for say Grobb with 100% custom textures you'd have to rename all new textures you wish to use as replacements to the current .bmp file textures you wish to replace in the .s3d file. Provided that's all easily possible your golden it's just a matter of finding custom free textures you want to use with a configured .bat file.
 
Super tired, so just a brief reply:

Changing the last 3 letters at the end of the extension is merely so you can use the .dds file as a .bmp file in the .s3d file.

I think this is all that's needed from a .bat file.

1) A way to extract .s3d textures. - Only needed if reusing original game textures for different zones.
2) A way to rename the file name and file name extension if necessary to .bmp. - Older zones used .bmp newer zones use .dds
3) A way to overwrite the new textures back into the .s3d file.
4) A way to backup your original .s3d file to a created folder (optional)

So basically for a complete zone overhaul for say Grobb with 100% custom textures you'd have to rename all new textures you wish to use as replacements to the current .bmp file textures you wish to replace in the .s3d file. Provided that's all easily possible your golden it's just a matter of finding custom free textures you want to use with a configured .bat file.

1. s3dspy does this and it can be done in bulk. (Maybe Nilbog's stuff does this?)
2. the batch file I posted will do this in under 1 second if you set up the variables correctly.
3. s3dspy does this and it can be done in bulk. (Maybe Nilbog's stuff does this?)
4. lots of options for this, including the .bat code I posted originally (after some modifications.) The below could also be easily be modified to do what you want. I was using the code below to back up my extracted textures after I did some funkiness:
Code:
@echo off

REM ****************************
REM Created By Daffie 2013-09-10
REM Archive dynamic file names from the specified directory.  Remove All other old files.
REM ****************************


REM Variables for archive- Edit the stuff between the quotes
	SET ArchiveFolder="ecommons.obj.s3d\"
	SET OutputFirstPartialLocation="C:\Users\Daffie\Desktop\EQ Textures\Saved\"

REM Variables for file locations - Edit the stuff between the quotes
	SET ExtractedTextures="C:\Users\Daffie\Desktop\EQ Textures\Extracted Textures From EQ\"
	SET VectoredTextures="C:\Users\Daffie\Desktop\EQ Textures\Extracted Textures From EQ\Vectored Textures\"
	SET ConvertedToPNG="C:\Users\Daffie\Desktop\EQ Textures\Extracted Textures From EQ\Vectored Textures\Converted to PNG\"
	SET ResizedPNG="C:\Users\Daffie\Desktop\EQ Textures\Extracted Textures From EQ\Vectored Textures\Converted to PNG\Resized PNG\"
	SET ConvertedDDS="C:\Users\Daffie\Desktop\EQ Textures\Extracted Textures From EQ\Vectored Textures\Converted to PNG\Resized PNG\Converted to DDS\"
	SET RenamedBMP="C:\Users\Daffie\Desktop\EQ Textures\Extracted Textures From EQ\Vectored Textures\Converted to PNG\Resized PNG\Converted to DDS\Renamed to BMP\"


REM create archive directory then Copy and Rename dynamic file names (overwrite in destination folder)
	MD %OutputFirstPartialLocation%%ArchiveFolder%
	COPY /y %ExtractedTextures%* %OutputFirstPartialLocation%%ArchiveFolder%*


REM Delete Old Files
	DEL %ExtractedTextures%*.bmp
	DEL %VectoredTextures%*.eps
	DEL %ConvertedToPNG%*.png
	DEL %ResizedPNG%*.png
	DEL %ConvertedDDS%*.dds
	DEL %RenamedBMP%*.bmp


REM Pause to see how many files have moved
	PAUSE


REM Exit Program
	END


EDIT - DOS is super easy to work with, so creating .bat files is really a cinch. There are only so many commands to the original lang., and all the basic stuff can be googled. The code I have posted in the my last 2 posts is really rudimentary copy/paste stuff. Anyone who is doing texture work could figure it out with very little effort. Be careful with the "copy /y" because it overwrites, and be super careful with "DEL" as this could be as bad as typing "FORMAT". Give it a shot and have some fun!
 
Last edited:
Super tired, so just a brief reply:


1. s3dspy does this and it can be done in bulk. (Maybe Nilbog's stuff does this?)
2. the batch file I posted will do this in under 1 second if you set up the variables correctly.
3. s3dspy does this and it can be done in bulk. (Maybe Nilbog's stuff does this?)
4. lots of options for this, including the .bat code I posted originally (after some modifications.) The below could also be easily be modified to do what you want. I was using the code below to back up my extracted textures after I did some funkiness:
Code:
@echo off

REM ****************************
REM Created By Daffie 2013-09-10
REM Archive dynamic file names from the specified directory.  Remove All other old files.
REM ****************************


REM Variables for archive- Edit the stuff between the quotes
	SET ArchiveFolder="ecommons.obj.s3d\"
	SET OutputFirstPartialLocation="C:\Users\Daffie\Desktop\EQ Textures\Saved\"

REM Variables for file locations - Edit the stuff between the quotes
	SET ExtractedTextures="C:\Users\Daffie\Desktop\EQ Textures\Extracted Textures From EQ\"
	SET VectoredTextures="C:\Users\Daffie\Desktop\EQ Textures\Extracted Textures From EQ\Vectored Textures\"
	SET ConvertedToPNG="C:\Users\Daffie\Desktop\EQ Textures\Extracted Textures From EQ\Vectored Textures\Converted to PNG\"
	SET ResizedPNG="C:\Users\Daffie\Desktop\EQ Textures\Extracted Textures From EQ\Vectored Textures\Converted to PNG\Resized PNG\"
	SET ConvertedDDS="C:\Users\Daffie\Desktop\EQ Textures\Extracted Textures From EQ\Vectored Textures\Converted to PNG\Resized PNG\Converted to DDS\"
	SET RenamedBMP="C:\Users\Daffie\Desktop\EQ Textures\Extracted Textures From EQ\Vectored Textures\Converted to PNG\Resized PNG\Converted to DDS\Renamed to BMP\"


REM create archive directory then Copy and Rename dynamic file names (overwrite in destination folder)
	MD %OutputFirstPartialLocation%%ArchiveFolder%
	COPY /y %ExtractedTextures%* %OutputFirstPartialLocation%%ArchiveFolder%*


REM Delete Old Files
	DEL %ExtractedTextures%*.bmp
	DEL %VectoredTextures%*.eps
	DEL %ConvertedToPNG%*.png
	DEL %ResizedPNG%*.png
	DEL %ConvertedDDS%*.dds
	DEL %RenamedBMP%*.bmp


REM Pause to see how many files have moved
	PAUSE


REM Exit Program
	END


EDIT - DOS is super easy to work with, so creating .bat files is really a cinch. There are only so many commands to the original lang., and all the basic stuff can be googled. The code I have posted in the my last 2 posts is really rudimentary copy/paste stuff. Anyone who is doing texture work could figure it out with very little effort. Be careful with the "copy /y" because it overwrites, and be super careful with "DEL" as this could be as bad as typing "FORMAT". Give it a shot and have some fun!
I read over Nilbog's post on EQemu on transpfx.exe and pretty certain all it does it touch up textures. For now I'm just going to work on do a full make over of Grobb with some 2k Skyrim textures and try to get it looking pretty nice then I'll worry about figuring out the .bat file after.

This could be neat. I'm looking over these skyrim mods and it's a complete gold mine of texture modding enhancements. I haven't even checked into the Fallout mod textures yet, but considering it's built around the same game engine if memory serves me right, but has a bit of a different atmosphere to it so probably lots of good stuff there as well. Plus all the textures you do find can be tweaked in GIMP/Photoshop for all sorts of custom effects to enhance upon them.
http://skyrim.nexusmods.com/mods/33392//?
 
Last edited:
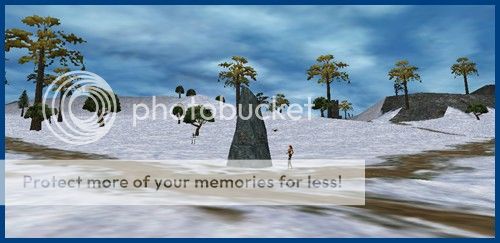
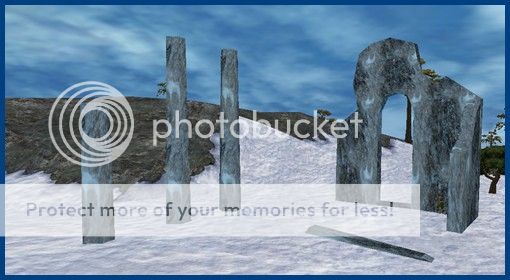
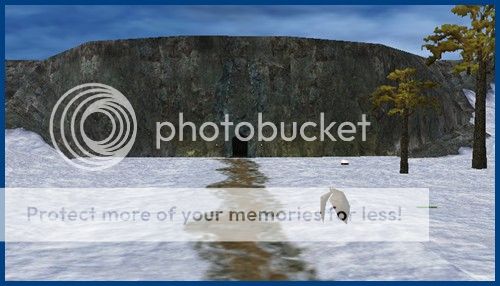
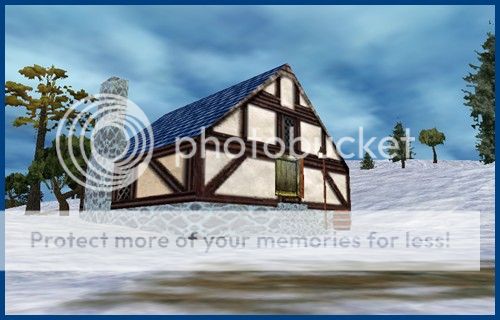
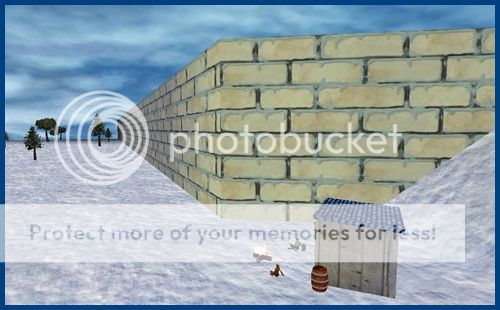
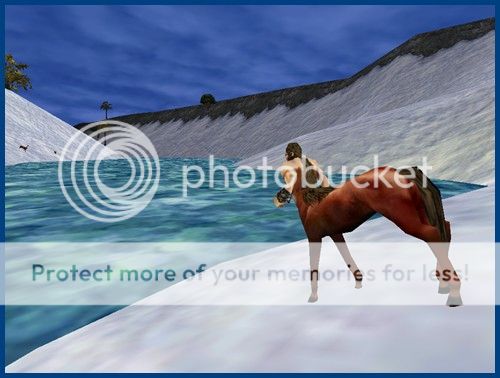
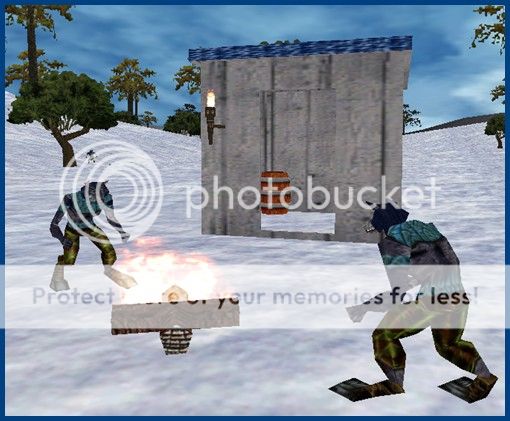
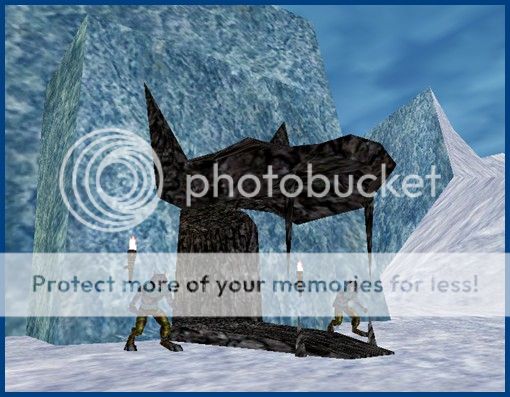
This thread got really technical really fast with the last few posts. :whoa: I'll need some time to digest the info and reply, but for now I couldn't help but share a fun project I put together earlier to retexture Centaur Hills (a.k.a. Qeynos Hills or qeytoqrg) into a snowy zone. All the textures have been pulled from other zones, primarily Great Divide, Stormkeep (a.k.a. Kael Drakkel), and Thurgadin. There are lots and lots of problems with the textures, such as certain seams not lining up and some textures having been flipped to the wrong orientation for no apparent reason; the screenshots below were taken to showcase only the successful parts of the retexture. ;)

SnowyCentaurHills1_zps00a05f18.jpg

__________________________________________________

SnowyCentaurHills2_zps7fe7ee0d.jpg

__________________________________________________

SnowyCentaurHills3_zpsd8f765ea.jpg

__________________________________________________

SnowyCentaurHills4_zps86c41e25.jpg

__________________________________________________

SnowyCentaurHills5_zps4b4f92d0.jpg

__________________________________________________

SnowyCentaurHills6_zps8eac4da0.jpg

__________________________________________________

SnowyCentaurHills7_zpsc4e3d23f.jpg

__________________________________________________

SnowyCentaurHills8_zpse6da8947.jpg
 
I've defiantly encountered issues with the textures not aligning properly, but don't really know how to go about fixing the problem. I tried to experiment with a solution the other day, but it didn't really work. The original .s3d EQ zone textures had the same exact problems though just in lower resolution at least from what I've seen and encountered thus far. Anyway here's some new pics of some more tweaks to Grobb.


Lastly few pictures I had to create the desired blood splatter effect for it manually using some Skyrim blood splatter texture enhancements with GIMP and layering them into wood texture image to get that overall effect turned out reasonably well. That was done in particular to replace bloodwood.bmp I'm satisfied enough with the results.


Guess what time it is? Guess what time it is?!? It's bashin time trollolloll!! Woot!! Woot!! With that out of the way more screenshots of Grobb now with more high definition bashin!!

In the first picture I tried to use DXT5 YCoCg scaled compression in GIMP and it made it look really screwed up. It's better to stick to DXT1, DXT3, or DXT5 in my experience. On a site note DXT5n can give a really interesting look at times so it's fun to experiment with to see how it will make the texture look same with DXT5alpha. It's important to check the texture you do compress after exporting just to ensure it looks as intended. In some cases using DXT1 can mess up the looks a lot, but it's file size is the smallest when it works it's great for keep the file size smaller, but when it doesn't it looks like hell. I haven't really encountered the same issue with DXT3 however the file size for DXT3 and DXT5 compression in my experience is the same anyway so I don't even see a reason to use DXT3 over DXT5 currently and uncertain what DXT3 offers or doesn't offer in comparison.


Now speaking of file size I scaled the resolution down to 2048 (2k) to 1024 (1k) for both the floor grcagr.bmp and ceiling grinnerca.bmp textures I changed here, but I plan to put them back to 2k textures to keep it as consistently as I can. I did it really just for testing purposes to see noticeable 1k vs 2k resolution textures would appear it's a lot less apparent than going from 512k or lower textures up to 1k or higher textures.


Last edited:
I took that base dirt floor texture that I tried to hue yellow earlier without the hue applied and exported it as DXT5n and it looked interesting so I tried it in game and it came out looking more extreme than I anticipated for Grobb, but it would look neat in Sol B perhaps.

Also decided I'd try it with the ceiling texture as well for the hell of it and it's even more absurd unlike the with floor texture I don't think would look too good in another zone personally at least without some tweaking with small tiles would have potential to look nicer possibly because it would blend better in fact a hint of blur could probably help it too. Really neat effect, but not something I want to use in Grobb.


This is how I'm keeping those two textures unless I do some minor cosmetic tweaks to them like I may add some faint blood splatter similar to what I did to some of the wood work to the dirt, but a lot more faint for just a very slight bit of added gore.

I thought it would be neat to add mushrooms on the ground and or walls in Grobb, but don't know how to go about doing so right now I thought it would add nice aesthetics. Perhaps though the tree's in Grobb could be replaced for mushrooms from say Fungus Grove and Grimling Forest that would be great. There are also the mushroom themed NPC creates as well I just think it would be a really nice touch.


Some more screenshots with a new texture replacement. This one is to replace oggmount2.bmp which is for the the actual entrance rock wall texture. The results weren't quite what I was going for, but at least I isolated the texture that goes to it which can be a bit of the tricky part sometimes.

It's a bit more algae then I was trying for need to get a better mix between rock and algae look a little algae wouldn't hurt though for the zone and would even fit in with the swampy vibe of Grobb itself. Despite not being quite what I wanted to blend with the other textures it was neat enough that it was worth showing off a bit, but it was fairly neat regardless.


Some more messing around with textures. I'm finding a lot of texture glitches with the game the more I mess around with it. Something that occasionally happens is textures for no apparent reason get rotated horizontally or vertically when they shouldn't. Another thing that happens and it seems to happen a lot more frequently is surfaces are incorrectly textured. It's rather aggravating to have a few small glitches spoil things aesthetically as badly as they do. I think if your willing to use a bit less texture variety within the zone you can at least in some cases get around the wrongly textured surfaces issue. Texture modding is a lot of fun, but EQ wasn't designed to support it from a player standpoint so issues defiantly occur that are pretty much beyond your control.


Last edited:
Added a bunch more textures though most are place holders and need some of the environmental objects added to them later. I did it just to clean things up and speed things along. The first 3 screenshots are showing off some of the various cosmetic texture glitches with Grobb.


The following 3 are just showing are the place holders that could use the environmental objects detailing touch ups for things like signs, weapons, and armor things of that nature that normally would hang on the walls.


I'm trying to make things more natural so I used the same texture for the floor both inside and outside the buildings overall it's a good improvement in my eyes looks much better and also corrects or mask some of texture problems the zone originally had.


It's a shame the Verant's early tree textures were done in such a weird way, because there's probably no way we'll ever be able to improve upon them thanks to the really weird transparency and distinct shape they make use of. :(
You might be able to upscale them to a higher resolution. There is a lot of graphic editing tricks around to do stuff in GIMP and Photoshop on the web so I wouldn't doubt it being possible.

The developers might be able to swap the old tree's in the objects table for newer ones like the revamps to nektulos and lavastorm used for example or even trees for different objects entirely like substituting the trees in Grobb for Grimling Forest mushrooms would make a lot of sense to me personally it compliments Trolls innate regeneration and atmosphere and the trees look completely out of place inside Grobb itself to begin with mushroom mushroom mushroom!

I was actually thinking about the way trees (leaves/branches) were done and how to upgrade them. The transparency was kind of genius, and also a totally klugy way to do things. We can say this now because graphics have been updated SO much since eq was originally coded.

I haven't tested much, but I think we are stuck with the way the textures are presented. I see a couple of options for upgrades.

1. Most obviously, I think we can upgrade the textures but leave the same coloring for the 'transparent' section of each texture. This really limits a lot of 'hands off' texture upgrading, and makes life pretty difficult for working in bulk. This is also going to make matching these textures to other changed textures very difficult.

2. I have no idea how hard (or even possible) it would be to recode the way trees are displayed in x zones. We are never going to see 3D modeling like Skryim or moder games, but maybe there are other options. (I think this is kind of what you are talking about, but I haven't not played with any of the mushroom textures yet, so I don't know how exactly they are displayed.)

3. Leave the leaves/branches alone and upgrade everything else (tree trunks can be upgraded easily.)

Maybe someone else has some thoughts?
 
That thought had occurred to me as well Daffie editing over everything aside from the pink transparency, but I also assumed it would be a lot more hands on. Filters like blend and blur can help make things match better as well.

Textures often vary within a game to a extent so they don't all have to be of the same size explicitly by any means, but it's usually nicer when they are closer naturally.

This guy did some work on new character model textures. I don't know if there was any pink transparency issues he had to deal with in the process of working on them or not though.
http://www.project1999.org/forums/showthread.php?t=116564&highlight=texture

It's EQ it's going to be low polygon no matter what to some degree or another plus it's part of the nostalgic charm of it. I like the contrast between high resolution and low polygon personally.

I was talking of making use of some of the updated 3D models for the same types of objects or even different ones that might better fit a zone. Grobb was made prior to Luclin obviously so they didn't even have those mushroom objects you see in Grimling Forest, but they'd be a good fit for the zone now and probably look better than the trees fit in with the zone. There are newer trees as well that weren't available when the game was created, but if they had been likely would have been used. If this new data can be manipulated and customized then we are golden to revamp the old 3D models for newer better looking ones.
 
Grinkles - Snow Centaur looks super cool
crazie007 - Those Oggok textures look really nice...especially the wood and PC shadows
Daffie - you good at thought typing

<-- Waiting on some DL'able texture packs

"You must spread more reputation around before giving it to above names."
 
Back
Top Bottom