Link
Currently comprising two small programs:
* Texture Adder - for adding new texture set data, allowing you to add custom mob model textures under new IDs rather than overwriting old ones.
* Transparentifier - for editing texture visibility flags, allowing you to e.g. tell the client to render arbitrary textures as semi-transparent, turn full transparency masking on/off, etc.
Proof of concept:

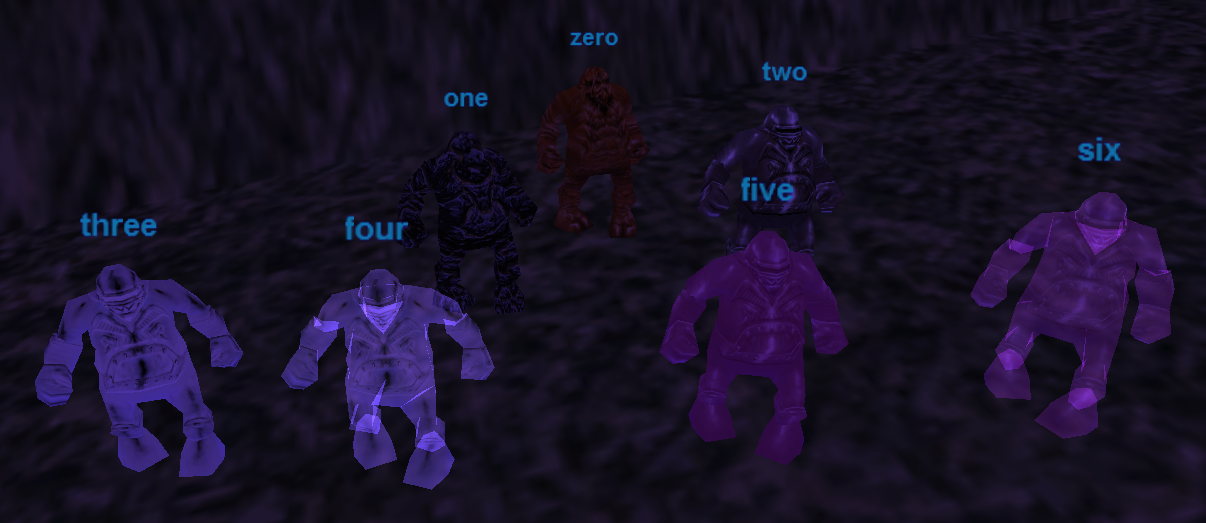
gfaydark_chr.s3d normally has 3 golem (GOL / race 17) textures, IDs 0 to 2. Here the number of textures has been expanded to 7, IDs 0 to 6, using the Texture Adder. Two of the added textures were made semi-transparent using the Transparentifier.
Instructions for Texture Adder:
1. Pick your desired _chr.s3d file and make a backup copy of it.
2. Extract the internal .wld file using S3DSpy.
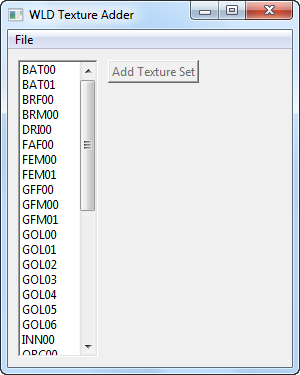
3. Run Texture Adder and select the .wld file from File > Load WLD. This will produce a list of model texture sets, like so:

4. Select a model texture set from the list.
5. Hit the "Add Texture Set" button. The texture set data entries for your current selection will be copied, and the newly copied data will be renamed under the next available ID. For example, if we selected FEM01 from the above list and copied it, we'd end up with a new entry for FEM with ID 02.
6. Using S3DSpy, note all the textures belonging to the model and ID you copied, e.g. FEMCH0101.bmp, FEMCH0102.bmp, FEMLG0101.bmp, etc, where the format is MDL__ID__.bmp. Create your new textures based on these and give them the new ID, e.g. FEMCH0201.bmp, FEMCH0202.bmp, FEMLG0201.bmp, etc.
7. Insert your new textures and the edited .wld file into the _chr.s3d file using S3DSpy.
8. Voila!
Note that the texture set data in the .wld file is different from the texture files that go into the .s3d. Other than the visibility/transparency settings (and some unknowns, see below), they basically just tell the client "a texture with this name exists, and you should try to load it for this model and ID".
Instructions for Transparentifier:
1. Pick your desired _chr.s3d file and make a backup copy of it.
2. Extract the internal .wld file using S3DSpy.
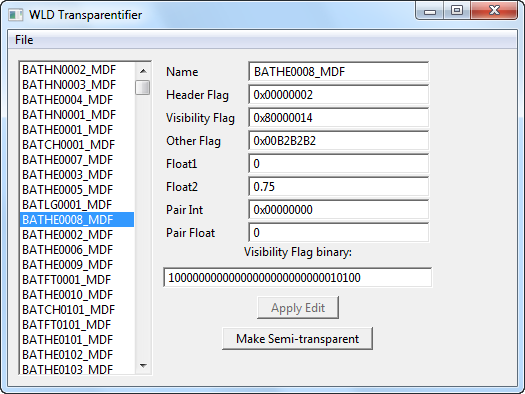
3. Run Transparentifier and select the .wld file from File > Load WLD. This will produce a list of texture data, like so:

The names should line up with the names of .bmp files in the .s3d. Most of the data fields on the right have unknown functions (and are presented just in case anyone might want to try to figure someting out by looking for patterns), but the one we're interested in is the "Visibility Flag". Typical textures have values like 0x80000013 or 0x80000014. The "Visibility Flag binary" field represents the same value, but in binary (obviously). This field can be edited; each of the ones and zeros potentially corresponds to one setting being turned on or off for that texture. Which bits do what has not been thoroughly tested, but the user is free to experiment. On the other hand, if you just want to make something semi-transparent, a button is provided to do just that. Note that the button is not very smart -- it justs pastes 0x80000017 over the current value rather than setting specific bits (I'm too lazy to puzzle out exactly which bits are needed just yet). This should work fine for textures that have values of 0x80000013 or 0x80000014 beforehand, but may cause crashes on others.
4. When you've changed what you want, insert the .wld file back into the .s3d file using S3DSpy.
5. Done!
Note that neither of these programs have been very thoroughly tested, so they may well have bugs, and they obviously aren't super user-friendly as far as the information that is displayed goes. Furthermore, they've only been tested at all for mob model textures from _chr.s3d files; whether they would be able to do anything useful for equipment models or zone geometry is unknown, but you're welcome to try.
Currently comprising two small programs:
* Texture Adder - for adding new texture set data, allowing you to add custom mob model textures under new IDs rather than overwriting old ones.
* Transparentifier - for editing texture visibility flags, allowing you to e.g. tell the client to render arbitrary textures as semi-transparent, turn full transparency masking on/off, etc.
Proof of concept:

gfaydark_chr.s3d normally has 3 golem (GOL / race 17) textures, IDs 0 to 2. Here the number of textures has been expanded to 7, IDs 0 to 6, using the Texture Adder. Two of the added textures were made semi-transparent using the Transparentifier.
Instructions for Texture Adder:
1. Pick your desired _chr.s3d file and make a backup copy of it.
2. Extract the internal .wld file using S3DSpy.
3. Run Texture Adder and select the .wld file from File > Load WLD. This will produce a list of model texture sets, like so:

4. Select a model texture set from the list.
5. Hit the "Add Texture Set" button. The texture set data entries for your current selection will be copied, and the newly copied data will be renamed under the next available ID. For example, if we selected FEM01 from the above list and copied it, we'd end up with a new entry for FEM with ID 02.
6. Using S3DSpy, note all the textures belonging to the model and ID you copied, e.g. FEMCH0101.bmp, FEMCH0102.bmp, FEMLG0101.bmp, etc, where the format is MDL__ID__.bmp. Create your new textures based on these and give them the new ID, e.g. FEMCH0201.bmp, FEMCH0202.bmp, FEMLG0201.bmp, etc.
7. Insert your new textures and the edited .wld file into the _chr.s3d file using S3DSpy.
8. Voila!
Note that the texture set data in the .wld file is different from the texture files that go into the .s3d. Other than the visibility/transparency settings (and some unknowns, see below), they basically just tell the client "a texture with this name exists, and you should try to load it for this model and ID".
Instructions for Transparentifier:
1. Pick your desired _chr.s3d file and make a backup copy of it.
2. Extract the internal .wld file using S3DSpy.
3. Run Transparentifier and select the .wld file from File > Load WLD. This will produce a list of texture data, like so:

The names should line up with the names of .bmp files in the .s3d. Most of the data fields on the right have unknown functions (and are presented just in case anyone might want to try to figure someting out by looking for patterns), but the one we're interested in is the "Visibility Flag". Typical textures have values like 0x80000013 or 0x80000014. The "Visibility Flag binary" field represents the same value, but in binary (obviously). This field can be edited; each of the ones and zeros potentially corresponds to one setting being turned on or off for that texture. Which bits do what has not been thoroughly tested, but the user is free to experiment. On the other hand, if you just want to make something semi-transparent, a button is provided to do just that. Note that the button is not very smart -- it justs pastes 0x80000017 over the current value rather than setting specific bits (I'm too lazy to puzzle out exactly which bits are needed just yet). This should work fine for textures that have values of 0x80000013 or 0x80000014 beforehand, but may cause crashes on others.
4. When you've changed what you want, insert the .wld file back into the .s3d file using S3DSpy.
5. Done!
Note that neither of these programs have been very thoroughly tested, so they may well have bugs, and they obviously aren't super user-friendly as far as the information that is displayed goes. Furthermore, they've only been tested at all for mob model textures from _chr.s3d files; whether they would be able to do anything useful for equipment models or zone geometry is unknown, but you're welcome to try.


